Well I lied.
I didn't feel like writing all week, but I feel like writing now.
Funny how that works.
Maple syrup season is pretty much over (already!) so I thought I should wrap up my maple syrup adventure and give you a little breakdown an how to turn your sap into syrup.
Ideally you want to do this as soon after you've collected as possible, because sap doesn't keep all that well. Last year we had close to 60 gallons go bad because we just couldn't keep up. If you have a large space for cold storage, the "urgency" declines. We have no storage whatsoever.
This year the trees weren't nearly as productive, thanks to the unseasonably high temperatures we've been having. The sap was also significantly darker than last year, resulting in a darker syrup. Did you know that there are different grades of pure maple syrup? I didn't know until last year (I was also admittedly an Aunt Jemima lover).
We like to work in large batches, because we're lazy like that. We're going to do some things different next year, but I'll explain that at the end of the post.
What you'll need:
- pots (in several sizes)
- propane
- something (safe!) to hold your large pot over the flame
- metal fine mesh strainer
- 2 high quality candy thermometer
- 1 hydrotherm
- several pre-filters
- heavy duty wool filter
- funnel
- bottles and caps
What you need to do:
1. Pour your sap through a fine mesh filter into a large pot. We begin filtering at this stage to get rid of bugs and large bits of debris. Set your pot up onto your propane burner, and boil hard - for a loooooong time.
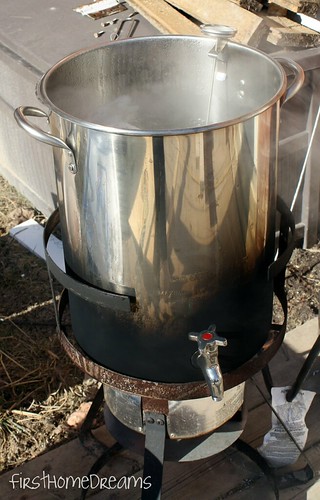
Your eyes do not deceive you - that's a turkey deep fryer. You'll know why in a minute. We like to do the majority of our boiling outside because the amount of water that evaporates from sap is outrageous. We don't have an exhaust fan in the kitchen, and we'd like our house to not turn into a steam room.
2. We boil outside until our sap reaches around 210 degrees Farenheit. This can literally take hours. And hours. And hours.
3. At this point, we move small batches of sap inside to "finish" into syrup on the stove. This is where the spigot on the turkey fryer comes in incredibly handy! Just throw a smaller pot below the spigot, open it up and fill. No man handling giant pots of boiling hot liquid required.
4. On the stove top, continue to boil your sap until it reaches a temperature of 7.30°F-7.70°F above the boiling point of water. Don't assume that the boiling point of water is constant! Always take the time to boil a pot of water and check the temperature required on the day you're finishing syrup. Humidity and outside temperatures can have a big impact.
5. You've hit the magic temperature - hooray! But you're not finished yet. In order for your sap to officially be syrup, it has to have a certain sugar content. Last year our "syrup" was far too thin, so this year we purchased a hydrotherm to help us get it right. A hydrotherm measures the density as a unit known as Brix. Optimal maple syrup density is between 66.5 and 67.5 Brix (and you can't sell something as maple syrup below 66 Brix).
Using the hydrotherm was intimidating, and it took some digging to find a good explanation of how to use it. I don't really know how it works, but I do know that in order for your sap to be syrup, your hydrotherm needs to be floating in your sample at a point where the level of syrup meets the top of the red line on the hydrotherm. Clear as mud, yes? It makes it even more complicated when the cup you're using to measure isn't clear. And you have terrible lighting in your kitchen so you're using a flash light to peer into the cup.
Side note: I wish we could afford a refractometer. They are magical.
6. Assuming that all has gone well, congratulations, you've made syrup! Now you need to pack it all up for storage. If you haven't already, turn your burner off. Syrup only needs to be at 180 degrees Farenheit for optimal packing. Grab your pre-filter and your wool filter - and stick the pre filter inside your wool filter.
Last year we made a mess. A huge mess. We poured our freshly made syrup into the filters, and stuck the end of the filter into a funnel, and the end of the funnel into the bottle. It was the worst. So this year we bought one of those big coffee urns meant for keeping coffee warm at conferences and the like.
Life saver. Or at least, floor saver. It made things unbelievably easier, especially since we were using wee 125 ml bottles this time around (because we're giving them out as wedding favours!). We stuck the end of the funnel into our little bottles, and then used the handy dandy spigot on the coffee urn to fill 'em up.
7. Once your bottle is filled, screw on your cap and lay the bottle on it's side for a minute or so. The hot maple syrup will sterilize and seal the cap.
8. Celebrate! Or make pancakes. Or celebrate by making pancakes.
What we'll do different next year:
- Use a rectangular pan with larger surface area to evaporate water more efficiently.
- Explore using wood instead of propane.
- Fine a clear cup for measuring density!
Have a good weekend!
Psssst! I'm linking this post up to...


